Capturing Images of the Milky Way

Bryce Canyon National Park

Bryce Canyon National Park

There is nothing more stunning than a clear image of the Milky Way Galaxy arcing overhead. The Majesty of the Galaxy is on display and you can feel yourself on the outer rim of the immense ring of stars…

By far, the most difficult part of capturing images of the milky way is simply getting there, at the right time!

When To Go

To get a good shot you need to go when there is NO moon in the sky. The moon reflects so much sun back, from the sun, that it washes out the Milky Way. Find a Lunar Calendar, the New Moon is when there is no moon in the sky, and you can get decent shots plus or minus 2 days from the New Moon. So, each month there is a 5 day window for Milky Way shots. The hard part of this, especially in Western Washington, is matching the New Moon with No Clouds!

govan school house hdr

Govan School House, Wilbur, Wa

Astrophotography with a DSLR

As far as capturing images like this goes, the equipment list is rather meager. You need a decent DSLR (a full frame body is best, but not mandatory) a wide angle lens ( 10 to 20mm is best, 24mm is fine) a tripod and a cable release (or electronic shutter release) and that’s really all you need, equipment wise.

Once you get out to your spot and get set up set the camera on manual exposure mode and open your aperture up all the way (use the lowest f/stop number) and then, using the chart here, set your shutter speed.

As for ISO, that is really the only variable. Depending upon your camera I would suggest starting at a relatively low ISO, say, 1,000 and then work your way up, checking the images as you go. Each camera will have its own ISO sweet spot, often its the mid point between the lowest and highest ISO setting on the camera.

One more important item is focus. You must set your lens on Manual Focus. Auto focus will not work at night and so, before you head out, take some time and figure out how to manually set the focus ring on your lens to infinity.

star trails at diablo overlook, north cascades highway

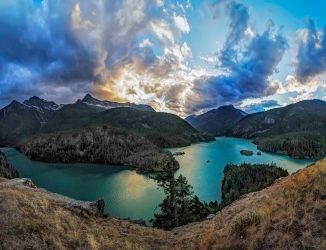
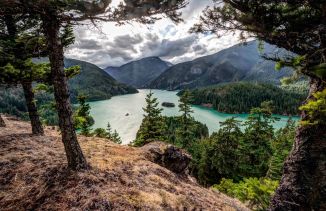
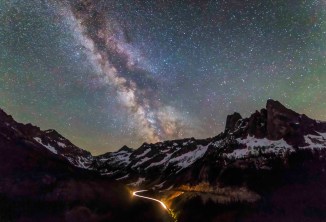
Diablo Overlook, North Cascades Highway

There are several way to do this, one is look up your lens on line, looking for the manual, or advice as to how to set that lens to infinity. Or another way is to sit with your camera (set the aperture open all the way when doing this) and take test shots of something at least 50 feet away and then review the image on your camera, using the zoom function and keep testing until you find that exact spot for your lens where its set for infinity, then make some mark or note or what ever so that when you’re out in the field at night you know where to set it.

That’s it! Then you can leisurely move about, composing shots and have fun (make sure to check your focus ring from time to time, moving your rig about can often change the focus setting!)

As you recompose try different ISO settings and Viola! Nice shots.

liberty bell and the milky from washington pass overlook on the north cascades highway

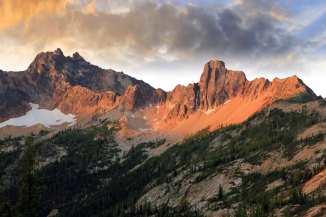
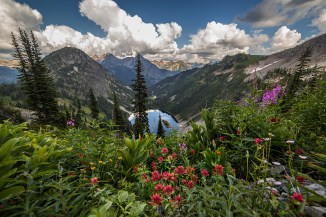
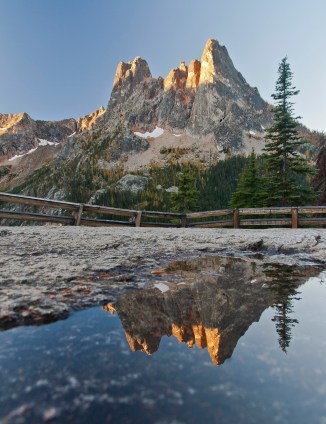
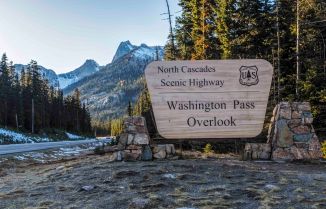
Washington Pass Overlook, North Cascades Highway

Locations

To get decent images you need to get away from the lights of civilization. If you shoot near a city the entire horizon is washed out, no stars, or very faint. Two of my favorite locations are on SR 20, the North Cascades Highway, (which is part of the Cascade Loop). The Diablo Lake Overlook, and the Washington Pass Overlook both have lots of good parking, rest rooms and are user friendly in the dark.

Photo Tours

You might want to come along on a Night Sky Photo Tours. We meet and drive out to some location away from the lights of civilization where we can set up and get clear images of the stars. Drive in Tours are available, as well as Hike in Photo Tours where we visit more remote spots such as Fire Lookouts for our Photo Shoot! You can find out more, and see details and dates here.

Winchester Lookout

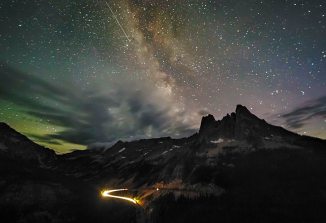
Winchester Lookout, Star Trails and the Aurora Borealis

North Cascades Photography – North Cascades Highway

Welcome to North Cascades Photography

Each week we will visit some place in the North Cascades. The best camp sites; day hikes and overnight trips; lookout towers, the best locations for sunrises, sunsets and night sky imaging. Whether you’re into a week long trip, or the best place for a drive-in view, I will cover  the best times to go and How To Tips ranging from How to set exposure for the Milky Way to Where to see Mountain Goats? 

North Cascades Highway

The North Cascades Highway (Highway 20) follows the Skagit River from the Puget Sound deep into the mountains, reaching its highest point at Washington Pass, 100 miles east of I-5, before it drops down to the Methow Valley.

In winter (usually at the end of November) the highway is closed due to heavy snow. The highway is gated on the west side at milepost 134, east of Diablo, and on the east side at milepost 171, 14 miles west of Mazama. Reopening in the spring is usually accomplished by early May.

In Sedro-Woolley the National Park Service and Forest Service share an office, right along the highway. You can stop in for maps and parking passes. They can also give you all sorts of great advice about where to go, current conditions, and all that.

As you head east towards the mountains you’ll pass through Marblemount. If you are planning to camp over night on the North Cascades National Park, you’ll need a permit, and this is the place to get it, the Marblemount Wilderness Information Center. This is also the last town to resupply anything for about 70 miles, so fill up!

The Diablo Lake Overlook (milepost 132) is a wonderful vista point to stop when driving. There are rest rooms and lots of parking. The view is amazing: late afternoon is the best light.

This is also a wonderful location for capturing images of the night sky.

Rainy Pass at 4,833 feet (milepost 157) is where the PCT crosses the North Cascades Highway. There are trailheads on either side of the highway:

  • On the north is the trail head for the Pacific Crest Trail, headed north to Cutthroat Pass and then onto Canada.
  • To the south the parking area is to access the Maple Pass – Lake Ann Loop trail (one of my favorites), and the paved Rainy Lake trail.

Lots more on these trails later!

Washington Pass Overlook (milepost 163) is at the highest point along the highway, at 5,477 feet. There is a paved spur road to parking, restrooms and a pathway to the overlook. Liberty Bell is the massive slab towering above. Sunrise is the time for the best light on the peak.

The long curve of the highway below makes for some sweet shots at night. This is one of the best spots for capturing images of the Milky Way.

The North Cascades Highway is a part of the Cascade Loop Scenic Byway. This 440 mile loop crosses the Cascade Range twice and visits some of the most stunning scenery in the USA. Visit their web site to earn EVERYTHING you need to make your trip a huge success.

You can find out more about Classes, Prints, Photo Tours and more at my web site, AndyPorterImages.com

Next Week: Tips on Night Sky Photography

North Cascades Photography – Introduction

Welcome to North Cascades Photography

Each week we will visit some place in the North Cascades. The best camp sites; day hikes and overnight trips; lookout towers, the best locations for sunrises, sunsets and night sky imaging. Whether you’re into a week long trip, or the best place for a drive-in view, I will cover  the best times to go and How To Tips ranging from How to set exposure for a shot of the Milky Way to Where to see Mountain Goats? 

Introduction

My fascination with the North Cascades started with a map.

In 1976 one of my friends read the Nat Geo article about a through hiker on the PCT. Several of us had recently finished a month long Outward Bound program in the Sawtooths, backpacking and rock climbing and we were excited for a new adventure.

I still have the map, from 1976

A few glances at the images and I was sending away for maps. When they finally arrived in the mail I poured over them, tracing the PCT and looking at the terrain.

Pacific Crest Trail, Pasayten Wilderness

It was the first time I’d heard of places like the Pasayten Wilderness and Crater Lake. At that time there was little to read about the trail, most of the planning for a thru hike was up to you.

When you study a map, planning mileage, elevation gain and water sources you try to envision the place. There were more then 20 maps for Washington and Oregon I sorted through, tracing the PCT and making plans. The place I was most captivated with, the most excited about visiting was the North Cascades. I wanted to see the Picket Range and hike over Whatcom Pass.

Mt Adams and Pacific Crest Trail, Goat Rocks Wilderness

First of all, it was clearly the most rugged section. There were other sections with higher summits, like Mt Rainier and Mt Adams.

But these giant peaks were surrounded by much smaller mountains. The North Cascades boasted the greatest density of topographical map lines. I imagined wave after wave of serrated ridges; steep U-shaped valleys, cloaked in green and mantled with glaciers. The names of the places fueled my imagination: Mount Terror and Mount Fury, Desolation Peak, Diablo Lake and Forbidden Peak were just a few. I couldn’t wait to get there. The only problem was that it wasn’t the easiest place to get to!

Sunset at Sahale Camp, North Cascades National Park

In the end we decided to hike the PCT through Oregon.  We hitchhiked from eastern Pennsylvania to Cascade Locks, Oregon, along the Columbia River and started our journey south.

My travels led me to many places, decades passed. But the allure and wonder of this place I’d never seen stuck with me.


Sahale Camp

It was 30 years before I made it back to see the places I’d dreamed of: Copper Ridge and the Chilliwack River, Mt Challenger and the Pickets…

I feel privileged to be able to see such things and humbled trying to capture some part of it in an image.

Now I live along the North Cascades Highway. Living on the doorstep of the mountains makes it easy to visit often. I truly feel at home.

Each week North Cascades Photography will visit some place in the North Cascades and share info on the best trails, camp sites, day hikes, long hikes, drive-in vistas, locations for Night Sky imaging and of course lots and lots of images.

You can always find out more about Trips, Classes, Photo Tours and more at my web site, AndyPorterImages.com

Next: The North Cascades Highway

Welcome to the North Cascades